Author Topic: shiftgate,auto trans  (Read 4986 times)

Cabo Bill

  • Guest
shiftgate,auto trans
« on: August 27, 2008, 11:51:12 »
does anyone know exactly how the spring on the shifter goes on? I have looked at the pictures in the tech manual and installed that way, but it seems to have less spring action than before I replaced the bushings Any help will be great.

scoot

  • Full Member
  • Platinum
  • ******
  • USA, CA, Altadena
  • Posts: 2355
Re: shiftgate,auto trans
« Reply #1 on: August 27, 2008, 16:09:32 »
Yes, we did ours last weekend.   When you say "how it goes on" do you mean where it belongs, or how to actually get it to fit in that space given fingers, etc?

The spring is one piece with a flat side that presses against the big shaft and the fork/prong ends (2 of them) of the spring press against the two "teeth" of the gear selector.   I'll have to find a picture (or you post a picture of the parts) and I can describe it better.

On a related note, how in the WORLD does anyone adjust the linkage the way the BBB says to adjust it?  From what I can tell we had to remove the transmission inspection cover and hold the trans up with a jack, raise the car enough to get under it, and then hit-and-miss with the lock-nut shift rod adjustment until it was close enough...

Scott
Scott Allen
'67 250 SL (early)
Altadena, California

Cabo Bill

  • Guest
Re: shiftgate,auto trans
« Reply #2 on: August 27, 2008, 16:59:32 »
The following is the link to the pictures of the shift gate as I am unable to send the pictures themselves: http://www.sl113.org/wiki/pmwiki.php?n=TransmissionClutch.shifter
Still unclear how the spring connects to the shifter. I  Thanks!

scoot

  • Full Member
  • Platinum
  • ******
  • USA, CA, Altadena
  • Posts: 2355
Re: shiftgate,auto trans
« Reply #3 on: August 27, 2008, 18:32:00 »
OK, here's my best attempt at explaining it.  Here's the picture:


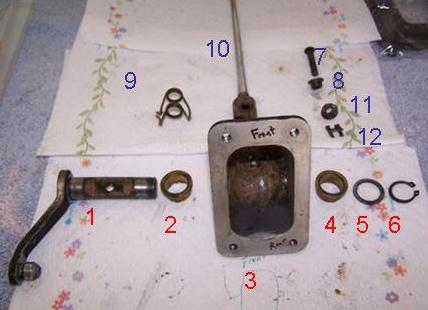
Reassembly requires parts to go back in this order:
1, 2, 3, 4, 5, 6  all go together in order listed.

7, 8, 9, 10, 9, 11, 12 all go back together in order listed.

BUT you have to have part 10 slid over part 1 when you assemble them such that part 7, 8, 9, 10, 1, 10, 9, 11, 12 all go together in that order.

When you do this, you need to make sure that part 1 is on the left and the pointing part of the base of part 10 is on the right.

So try this:  Assemble in this order 7, 8, 9, 10, 9, 11 WHILE 10 is slid over 1.  Don't put on the part 12 that locks it in place -- this is just to give you an idea of how it works.  So the spring is what you are having problems with.  The coil parts of the spring will have the two metal bushings seated in them.  The flat part of the spring in the middle will be pressing against the left side of the shaft of part 1.  The two remaining L shaped ends of spring 9 will individually press against each of the two point ends at the bottom of part 10.  The result should be that the spring will cause the lever 10 to always want to spring to the left.  Did that work?  If so then take it apart and put it together again but this time you need to have it inside of part 3, which means you have to do a bunch of this assembly inside a little space.   Perhaps someone else can describe this better.  Good luck!!!!!


« Last Edit: August 27, 2008, 18:45:13 by scoot »
Scott Allen
'67 250 SL (early)
Altadena, California

Cabo Bill

  • Guest
Re: shiftgate,auto trans
« Reply #4 on: August 27, 2008, 19:43:00 »
Scott-YOU ARE THE MAN !!! i HAD THE SPRING BACKWARDS ASPER THE PHOTO THAKS AGAIN       bILL 71 280 sl

Cabo Bill

  • Guest
Re: shiftgate,auto trans
« Reply #5 on: August 30, 2008, 13:10:52 »
Scott-did you ever find out how to adjust the shift linkage? I was reading thru old posts and saw that the adjusting nut end of the rod should be closest to the trans. mine was installed the opposite way so that is how I put it back. now I don't know which way is correct!I also read in the BBB that car must be resting on it's wheels to be adjusted.Does anyone know what is correct? Bill 71 280SL Automatic

scoot

  • Full Member
  • Platinum
  • ******
  • USA, CA, Altadena
  • Posts: 2355
Re: shiftgate,auto trans
« Reply #6 on: August 30, 2008, 19:09:16 »
quote:
Originally posted by Cabo Bill

Scott-did you ever find out how to adjust the shift linkage? I was reading thru old posts and saw that the adjusting nut end of the rod should be closest to the trans. mine was installed the opposite way so that is how I put it back. now I don't know which way is correct!I also read in the BBB that car must be resting on it's wheels to be adjusted.Does anyone know what is correct? Bill 71 280SL Automatic

All of the parts books I have show the adjusting nut on the shift rod being on the side closest to the gear selector, which does make it extremely inconvenient.  I put mine back that way anyway.

I also followed the BBB regarding having all the wheels on the ground.  Another major pain.  Well, it wasn't actually on the ground, it was on 4 x 6 lumber under the wheels so that it was possible to get underneith.

The course adjustment needs to be done with the retaining nut and turning the shift rod to the desired length.  Maybe you will get lucky and not have to do that!  Doing that with the linkage installed was impossible for me, so it involved pulling the linage back out via the shift selector opening, adjusting it, and reattaching it to the ball/socket at the bottom of the gear selector and then stuffing it back through the hole that the gear selector comes out of.

The fine adjustment is on the transmission side of the shift rod -- there are two screws that are in oval-shaped holes.  If you loosen those screws you can adjust the effective length of the shift rod such that N on the gear selector (or "O" as the case may be) lines up with where "N" is on the transmission side.  This part was easier.

Throughout this process, we had to have the transmission cover removed and the transmission supported by a jack in order to get access to the parts mentioned.  MB doesn't say anything about this.  Perhaps another forum member can comment on this.  Perhaps we did it in not the easiest way.
Scott Allen
'67 250 SL (early)
Altadena, California